Standard Process – Asset Management
Description: Wavity offers a platform solution that can be used to manage IT and Non-IT Assets in your organization with major features such as Inventory Management, Role based Dashboards, QR and Barcode capable, Automated responses, Analytics & Reports, RPA Powered Application etc.
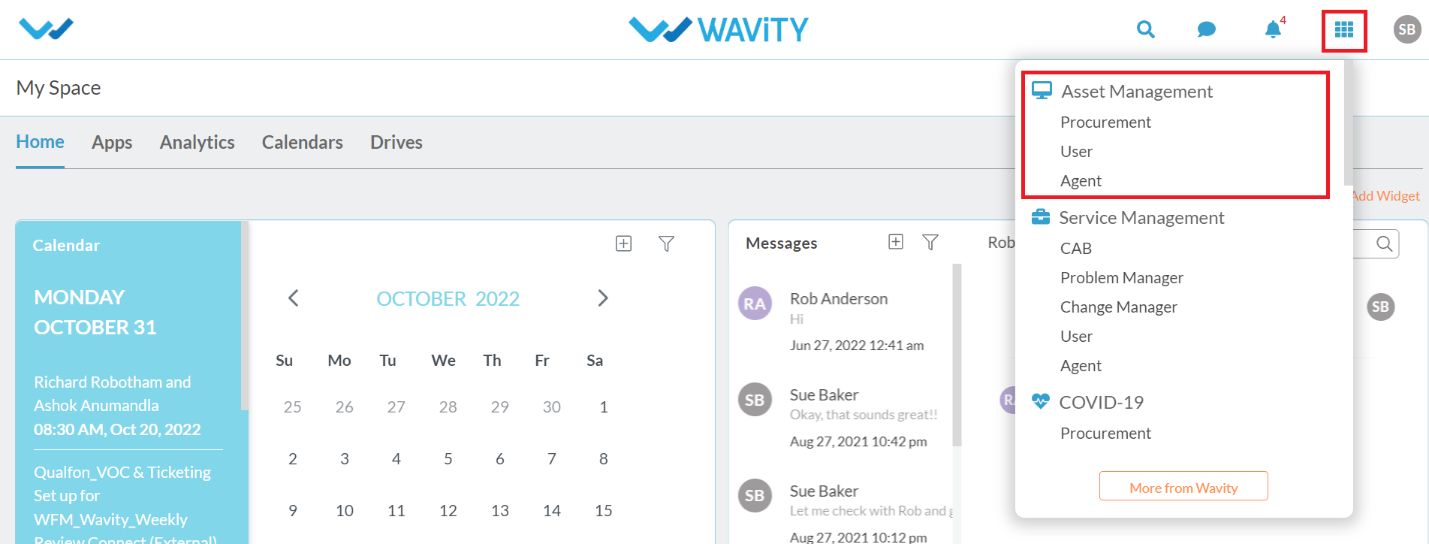
Dashboards: Wavity provides 3 Role based dashboards as part of standard solution for IT Asset Management Solution. The 3 Dashboards are 1) End Users, 2) Agent/IT Admin, 3) Procurement Team (Refer below image).
Add User and Groups:
- In the general settings, Add users with details like name, email address and in the groups add users into their respective groups.
- Dashboards can be created by using groups.
- Access levels in the applications can be provided by giving the group names in the different sections.
- Please refer below link: Getting Started Archives – Wavity
End Users:
- Login to your Wavity account. After logging in, User dashboard will be displayed as shown below. Dashboard can be edited by clicking on ‘Edit Dashboard’. User dashboard contains the following major functions:
Quick Links: Quick Links helps to navigate through the platform.
Analytics & Reports: Analytics and reports based on role and data in the platform.
Activity Stream: It will display all the activities carried out in the platform.

- In quick link “Asset Request” the user can create a request for an asset with all the details and submit it.
- User can mention the type of asset which is required. Category can be mentioned whether it is Hardware or Software category. Sub-Category will contain the value based on Category that user has selected.
- Subject is a required field where the user can mention the subject name.
- In Description text box, User can mention in detail the configuration of the Asset requested. User can attach pictures, link or videos in the description box.
- After filling in all the details, User shall click on “Save” button to create the request.

- After submission of Asset Request, Email Notification will be sent to the Assigned Manager of User for Approval.
- Upon Manager’s approval, Agent will be assigned to work on Asset Request submitted by the User (Requester).
- Click on “My Assets” quick link in the user dashboard for the user to view all the assets assigned to him/her.
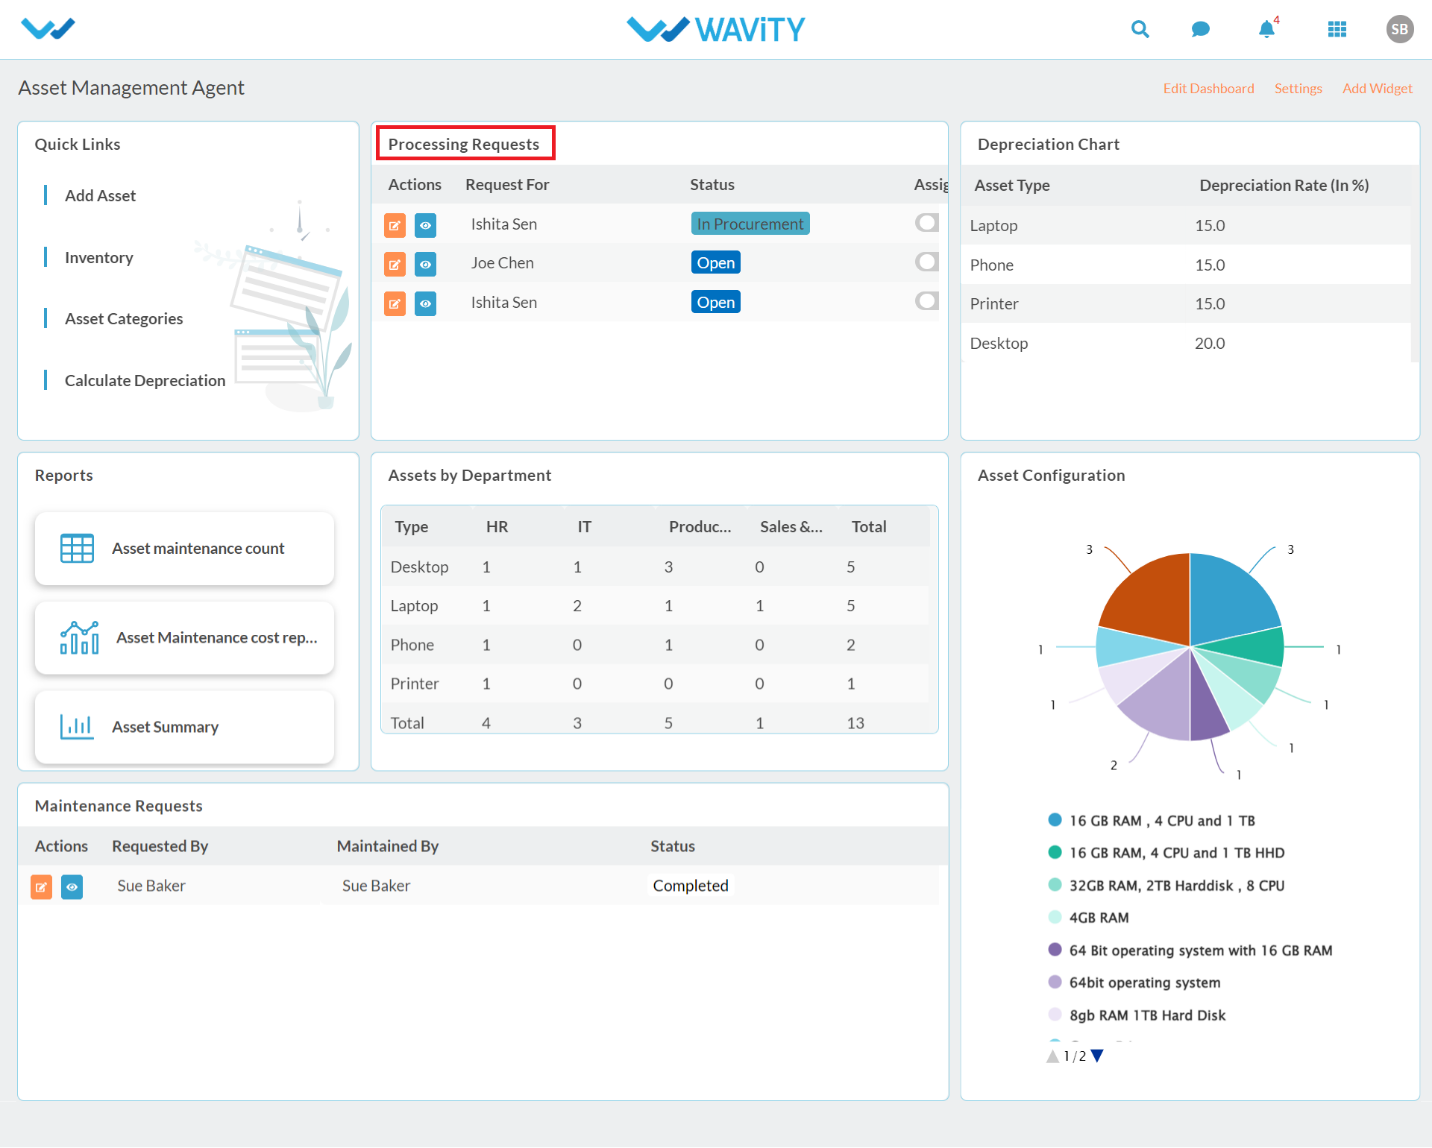
Agents/IT Admin:
- Login to your Wavity account. After logging in, Agent dashboard will be displayed as shown below. Dashboard can be edited by clicking on ‘Edit Dashboard’. Agent dashboard contains the following major functions:
Quick Links: Quick Links to navigate through the platform.
Analytics & Reports: Analytics and reports based on role and data in the platform.
Activity Stream: It will display all the activities carried out in the platform.
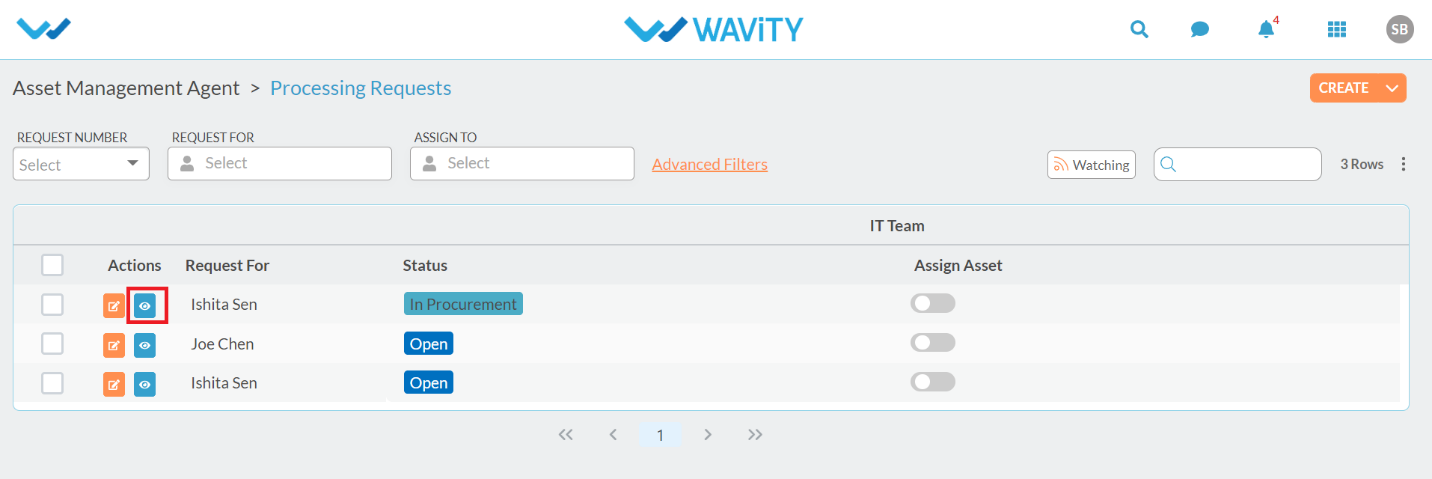
- Click on “Processing Request” for agent to view all the pending asset requests assigned to him/her.
- Click on ‘Blue Icon’ to view/edit the details.
- Asset Request number and requester (user) information will be auto generated. In the Request control, Click the link as shown below.
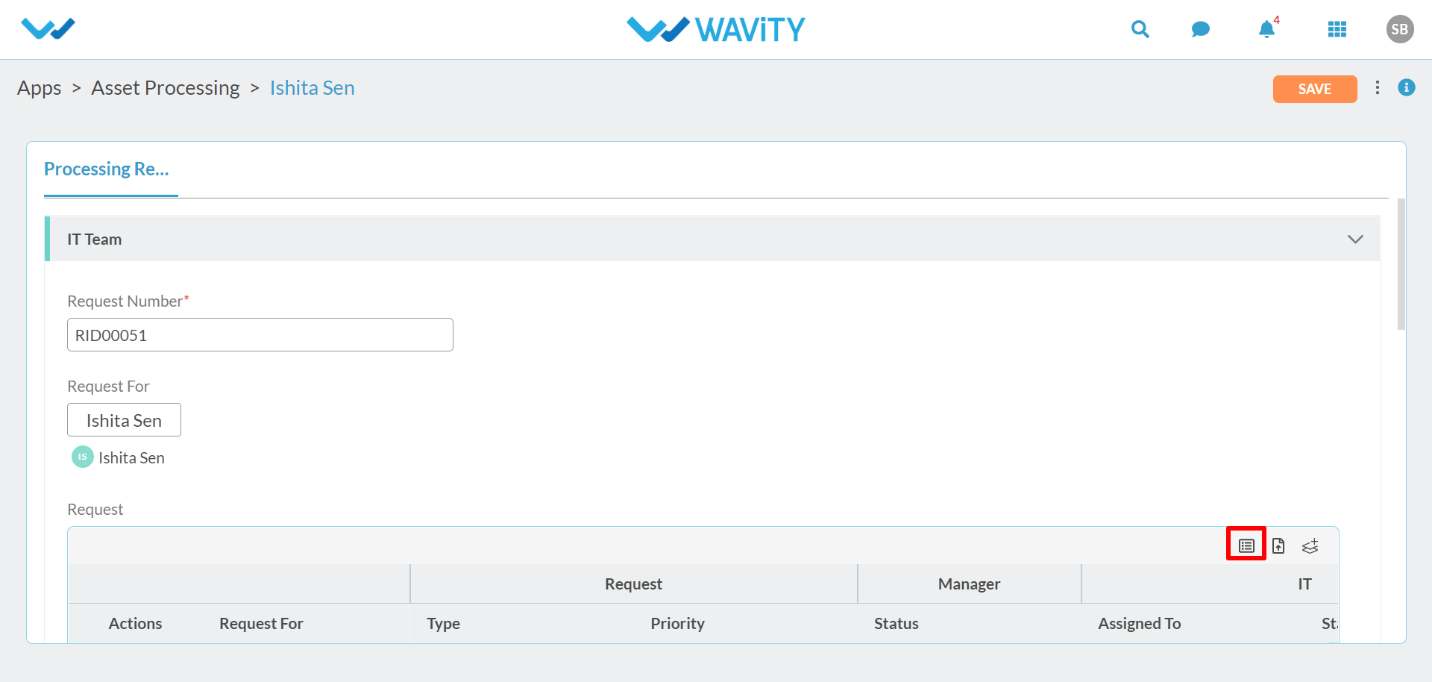
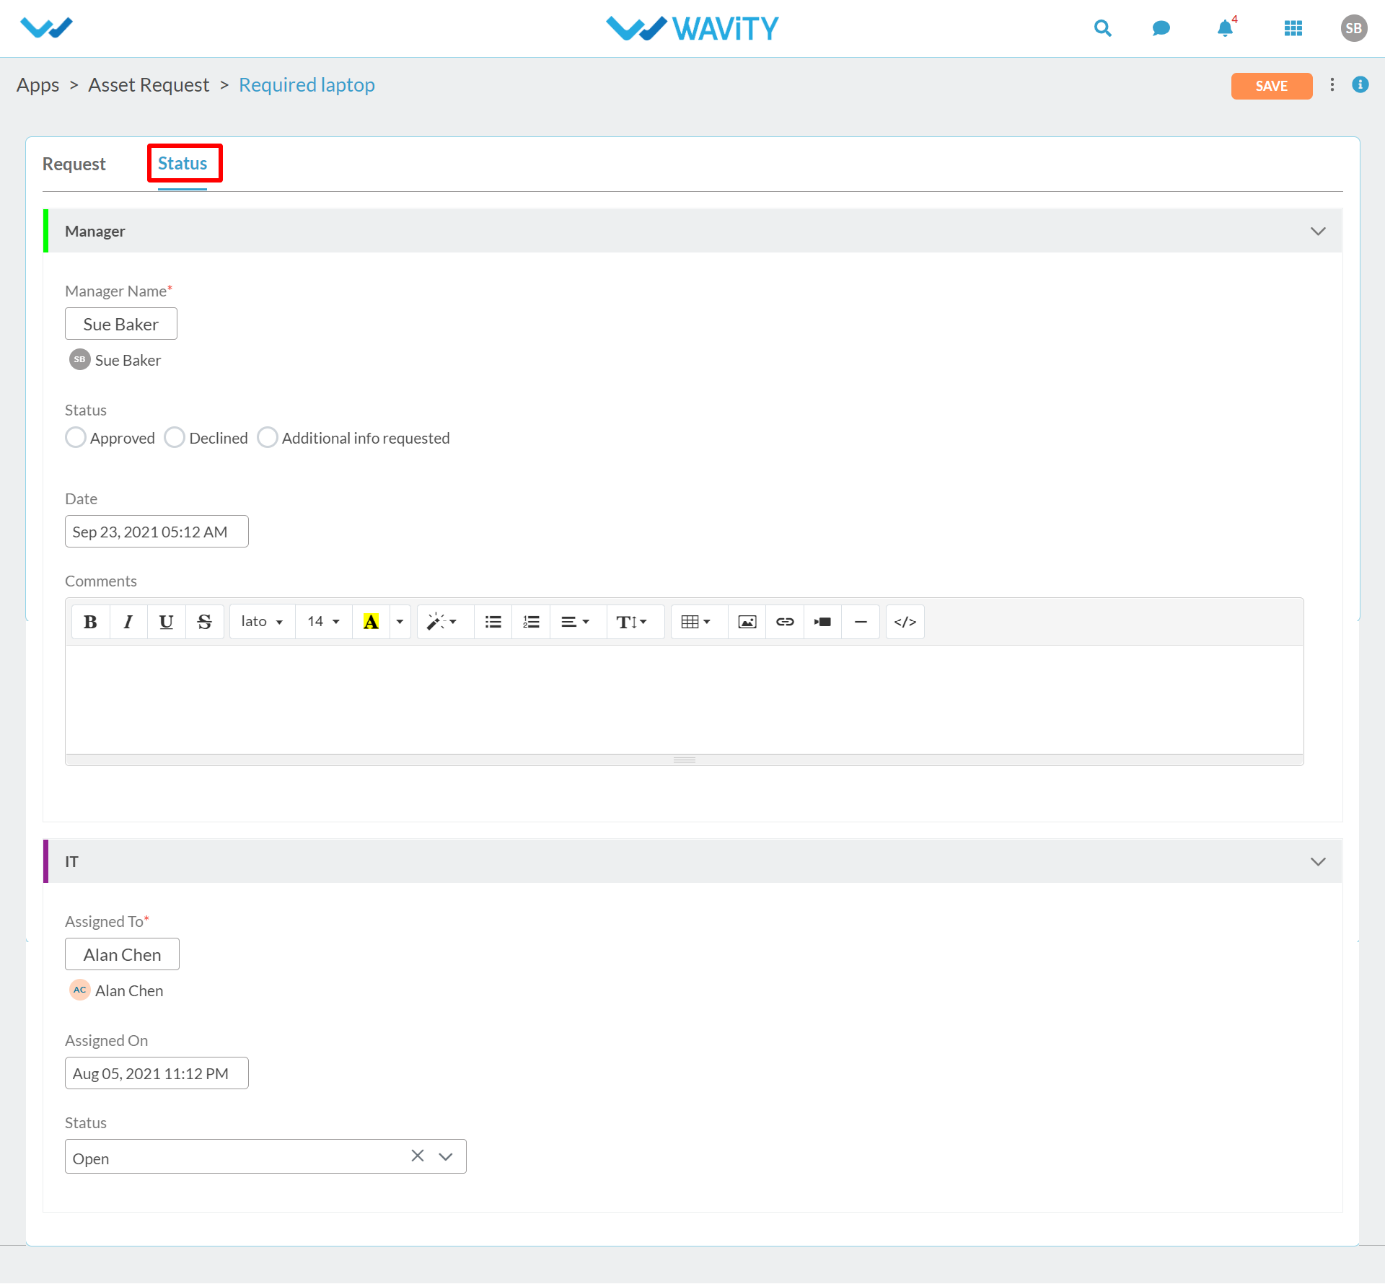
- Here, Agent can view all the details of asset request and whether the Manager has approved the asset request.
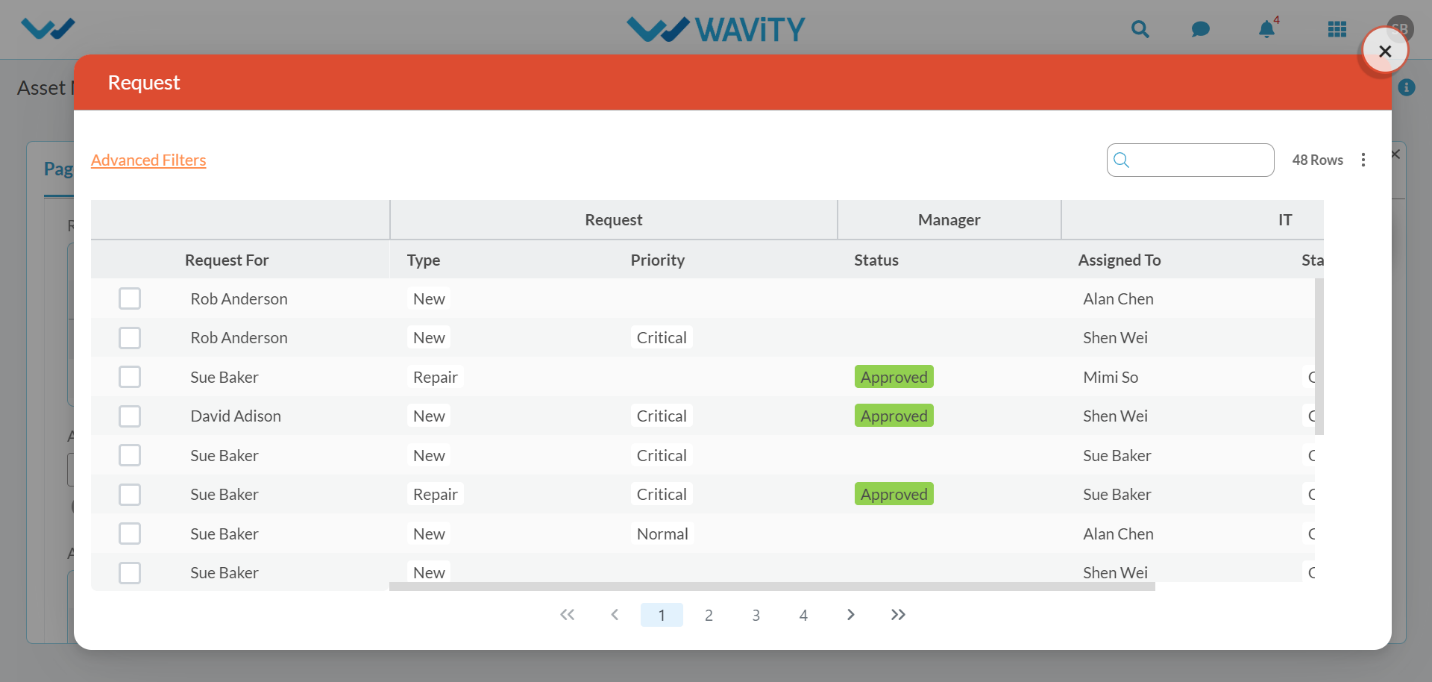
- In the Asset control, Click the below link as shown below to view all the available assets in the inventory which matches with the request.
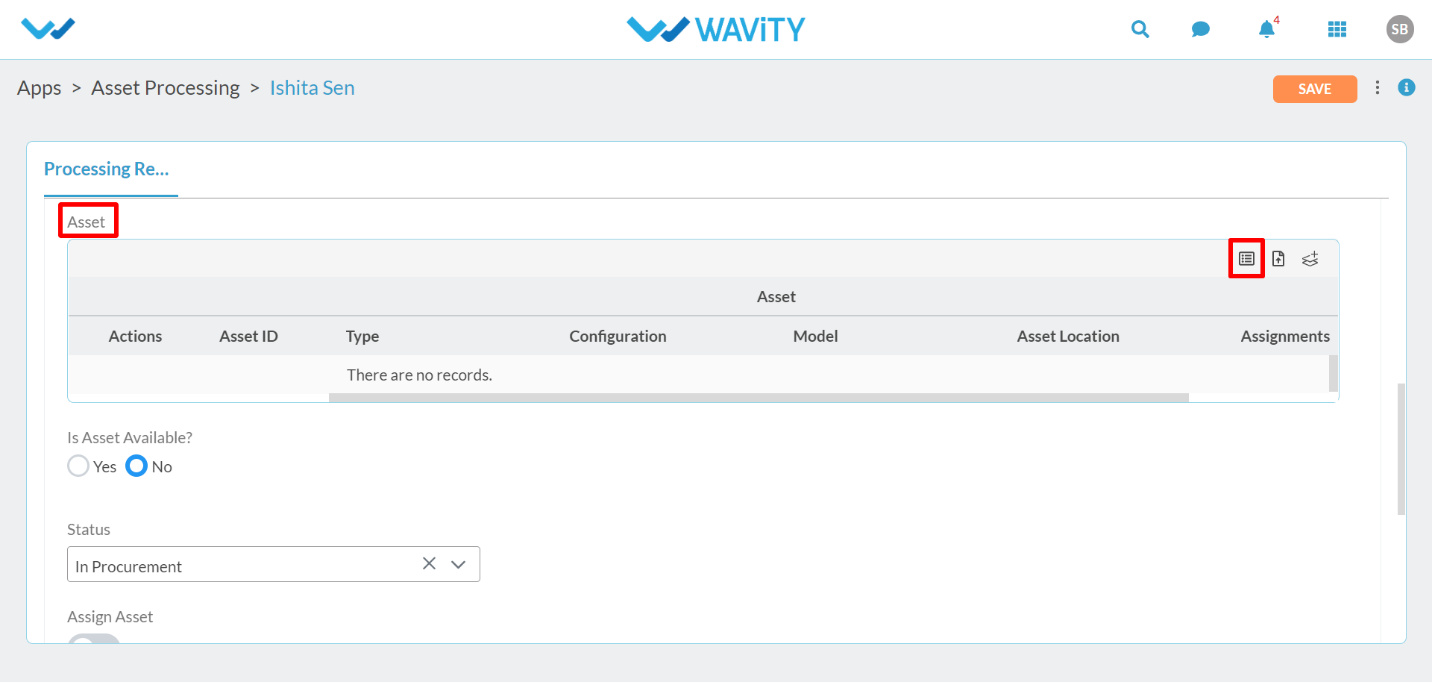
- Select the Asset (As shown below) which matches with the Asset request.
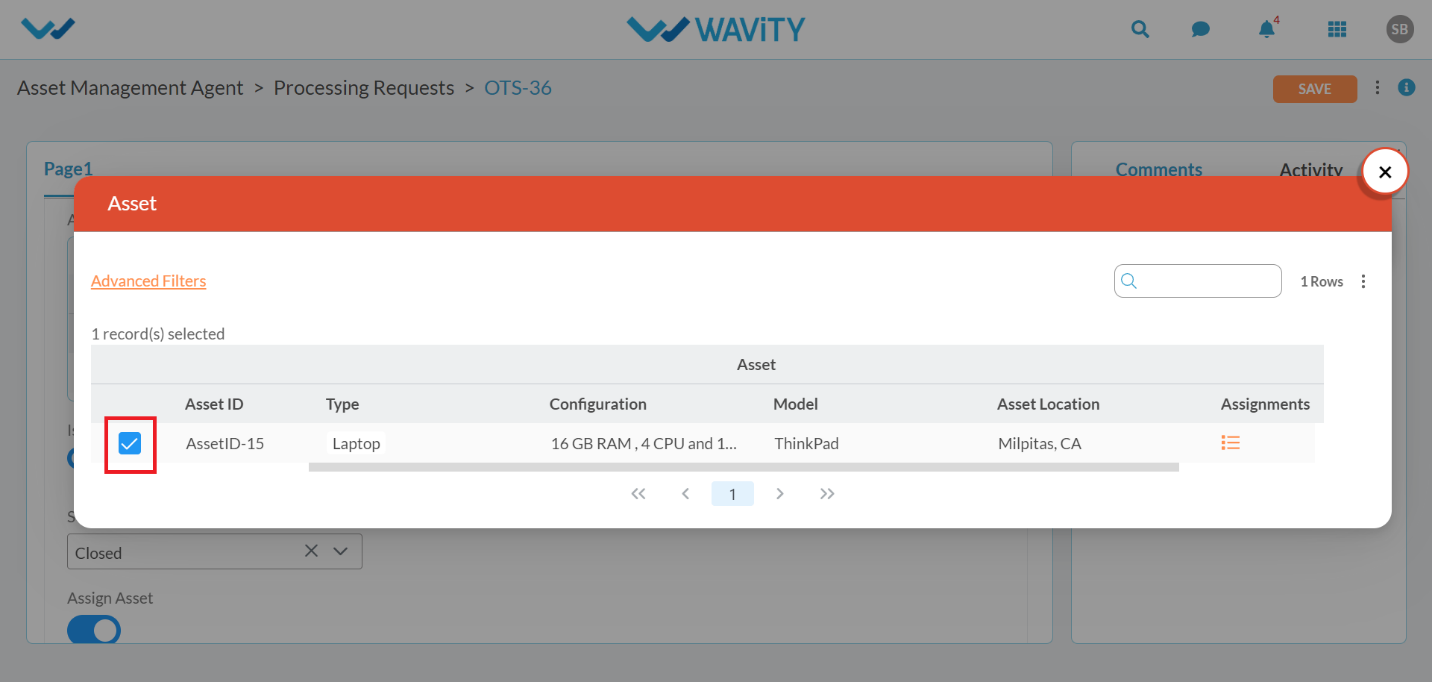
- Click on ‘Yes’ if the Asset is available and matches with the request. You can select the status as closed. Turn the “Assign Asset” toggle on to assign this asset to the requester. Requester (User) will be notified through email.

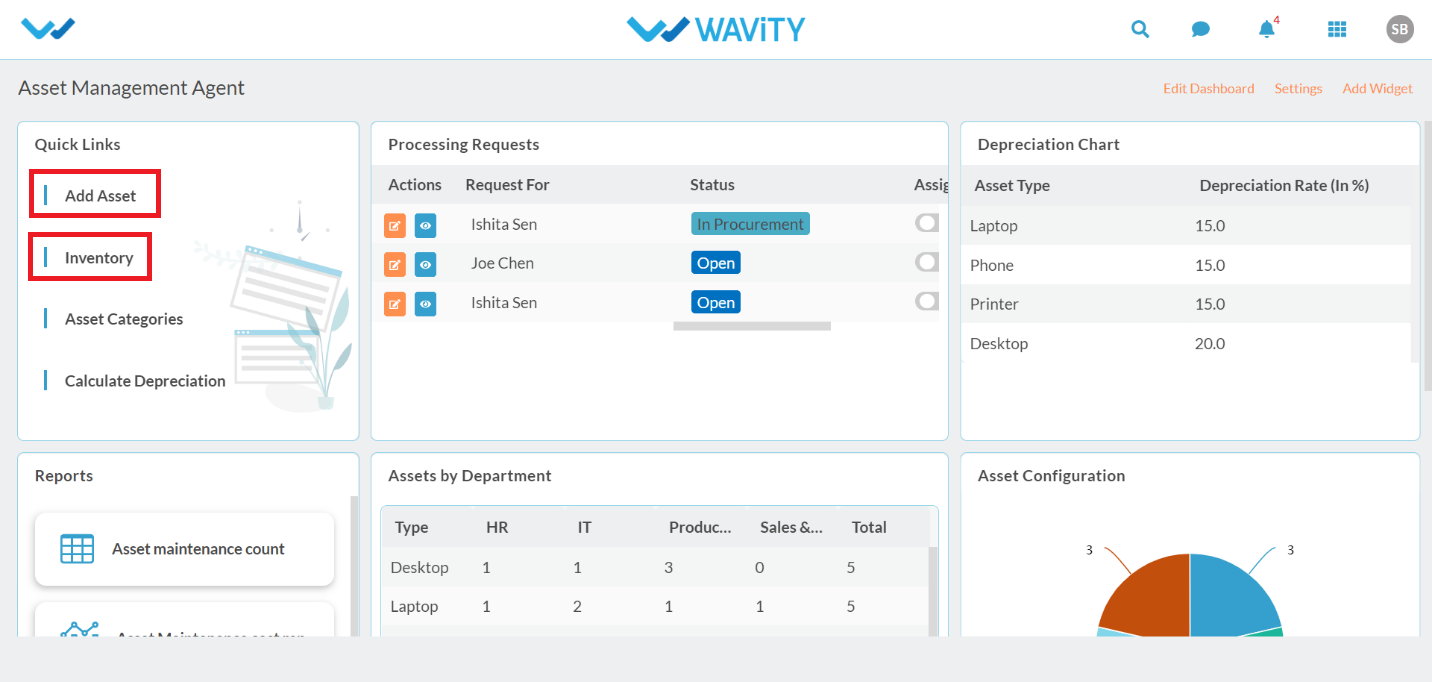
- Click on “Add Asset” in the quick links to add assets with complete description in the Inventory.
- Click on “Inventory’ in the quick links to view all the Assets in the Organization.
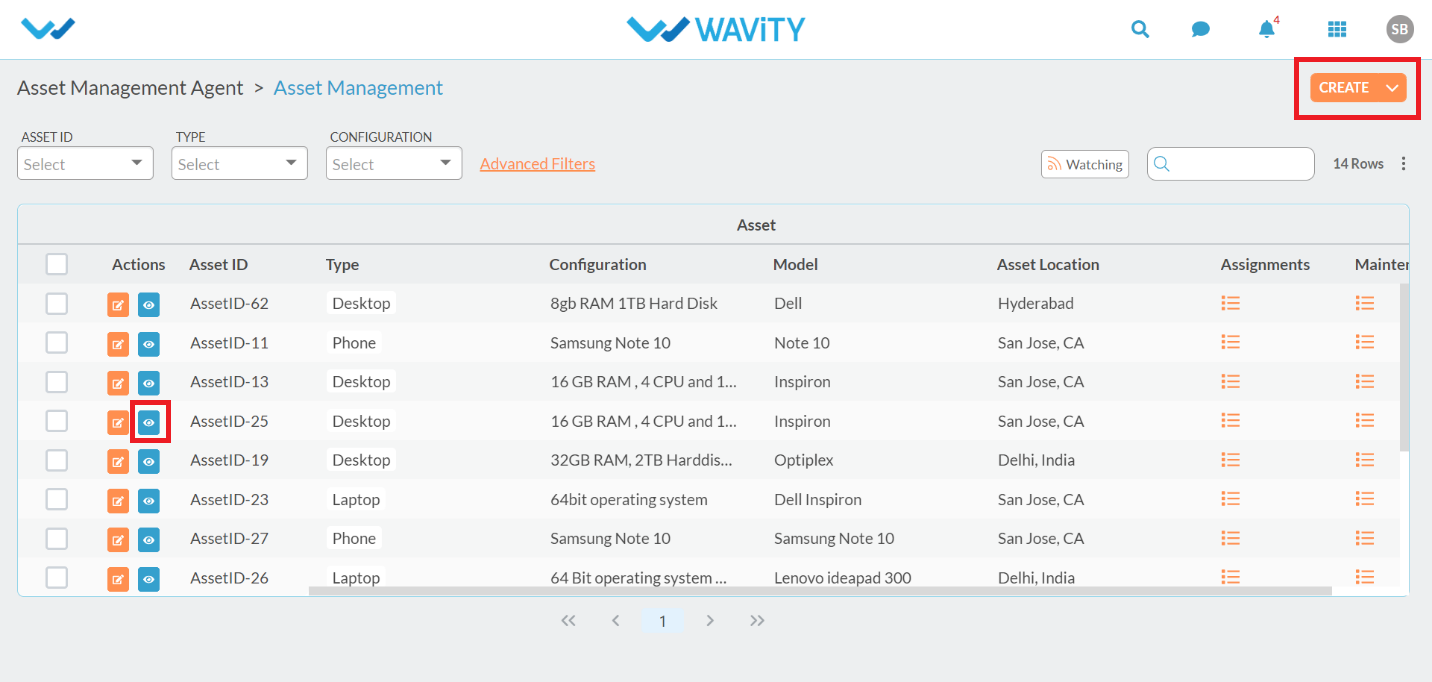
- In the Inventory page, You can apply advanced filters if needed.
- Adding Assets to Inventory can be done in 2 ways; 1) Add Assets manually by clicking the “Create” button, 2) User bulk upload option to import data through Excel Sheets.
- Click on “Blue Icon” as shown below to view/edit the details.
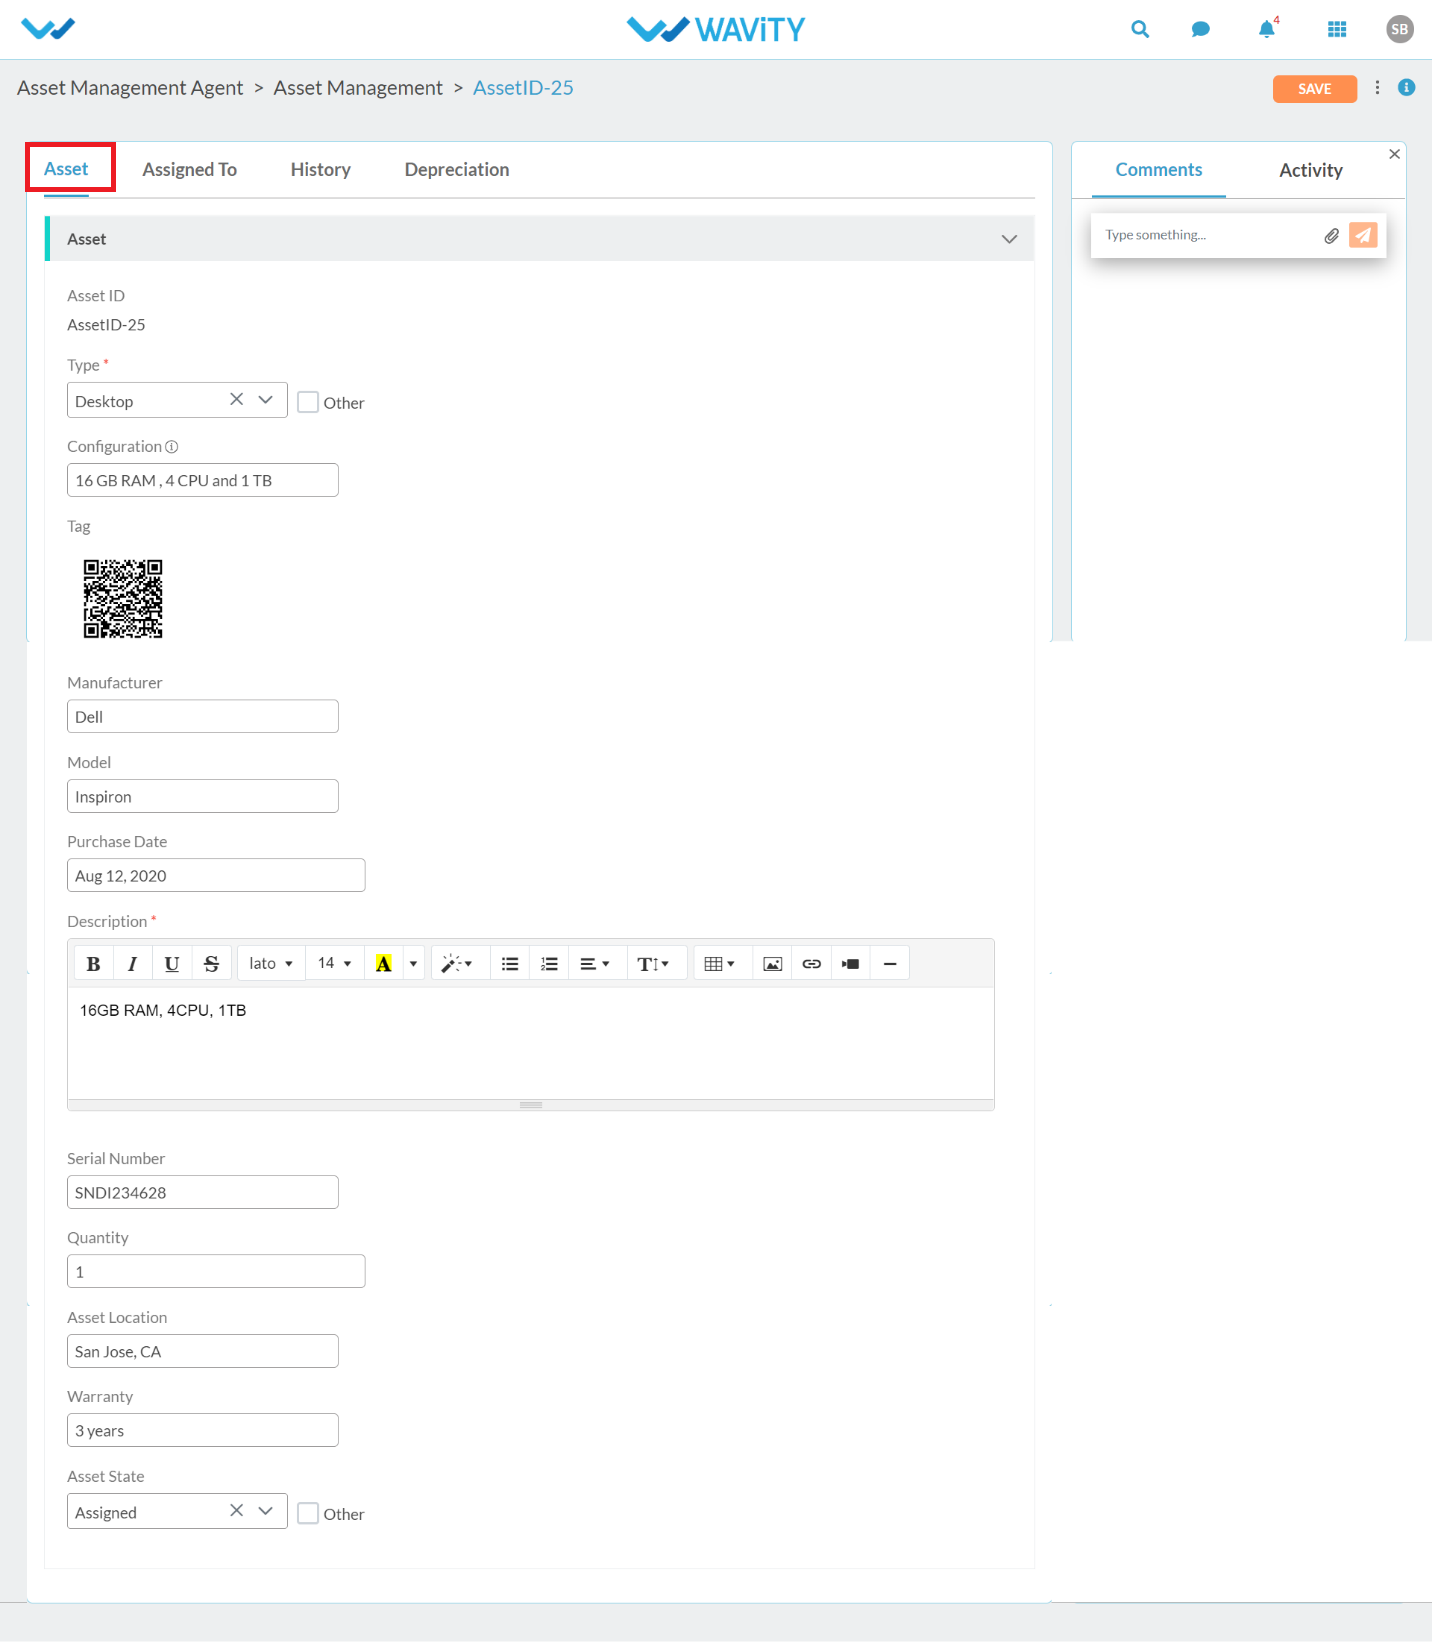
- All the information regarding the Asset will be displayed as shown below.
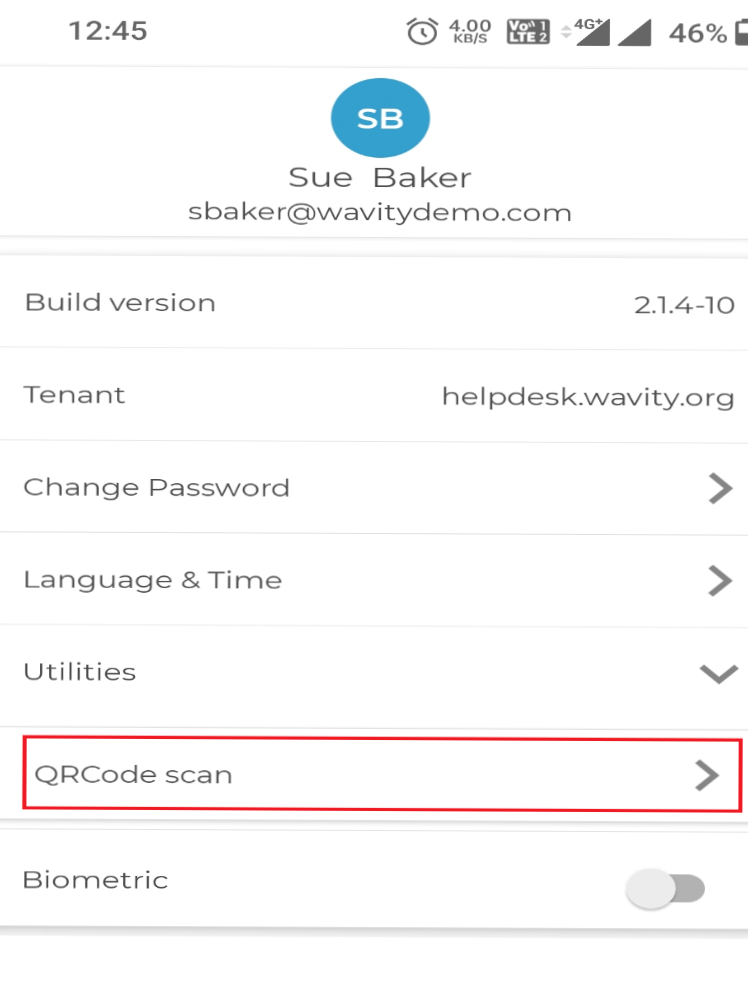
- Asset ID and QR Code Tag are auto generated. You can Print the QR Code and Paste it on the respective asset. You can use the ‘Wavity’ Mobile app scanner by enabling “QR Code Scanner” feature as shown below.
- By using ‘Wavity’ Mobile App scanner, you can get all the information regarding the Asset including Manufacturer, Model, Purchase date, Description, Serial Number, Asset Location and Quantity, Warranty and Asset State.
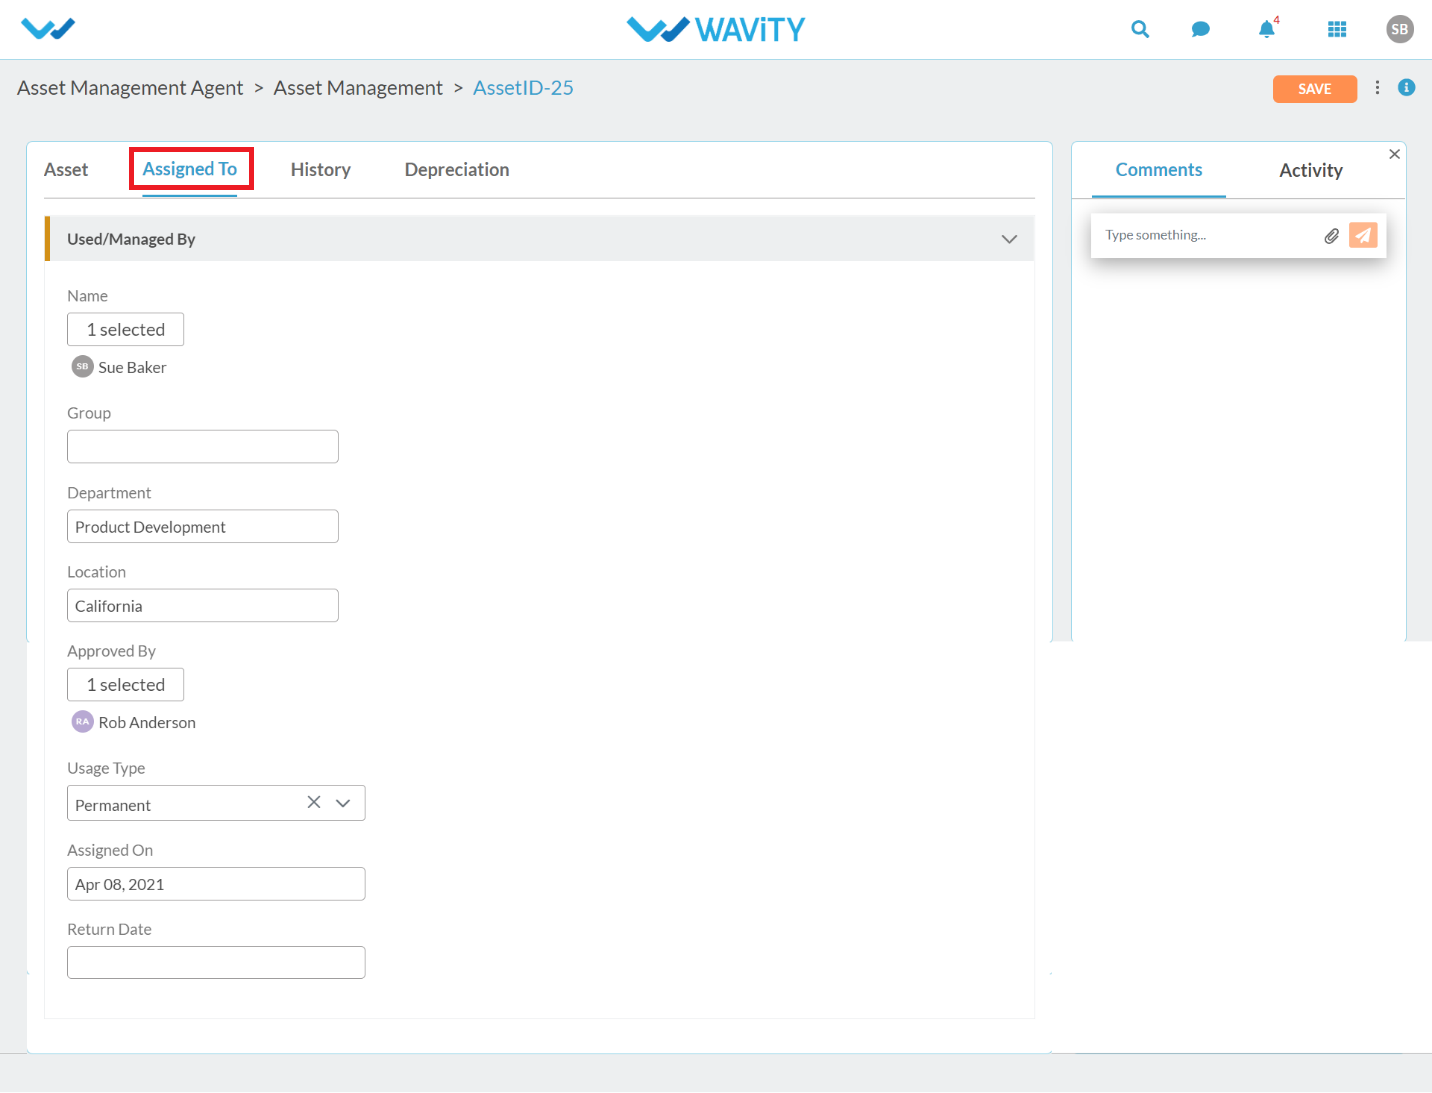
- In the ‘Assigned To’ section, you will be able to view the user details like user’s department, location and Approver’s contact details.
- Usage Type and Assigned date can be also viewed in ‘Assigned To’ section. If the Asset is returned by the user, return date will be displayed.
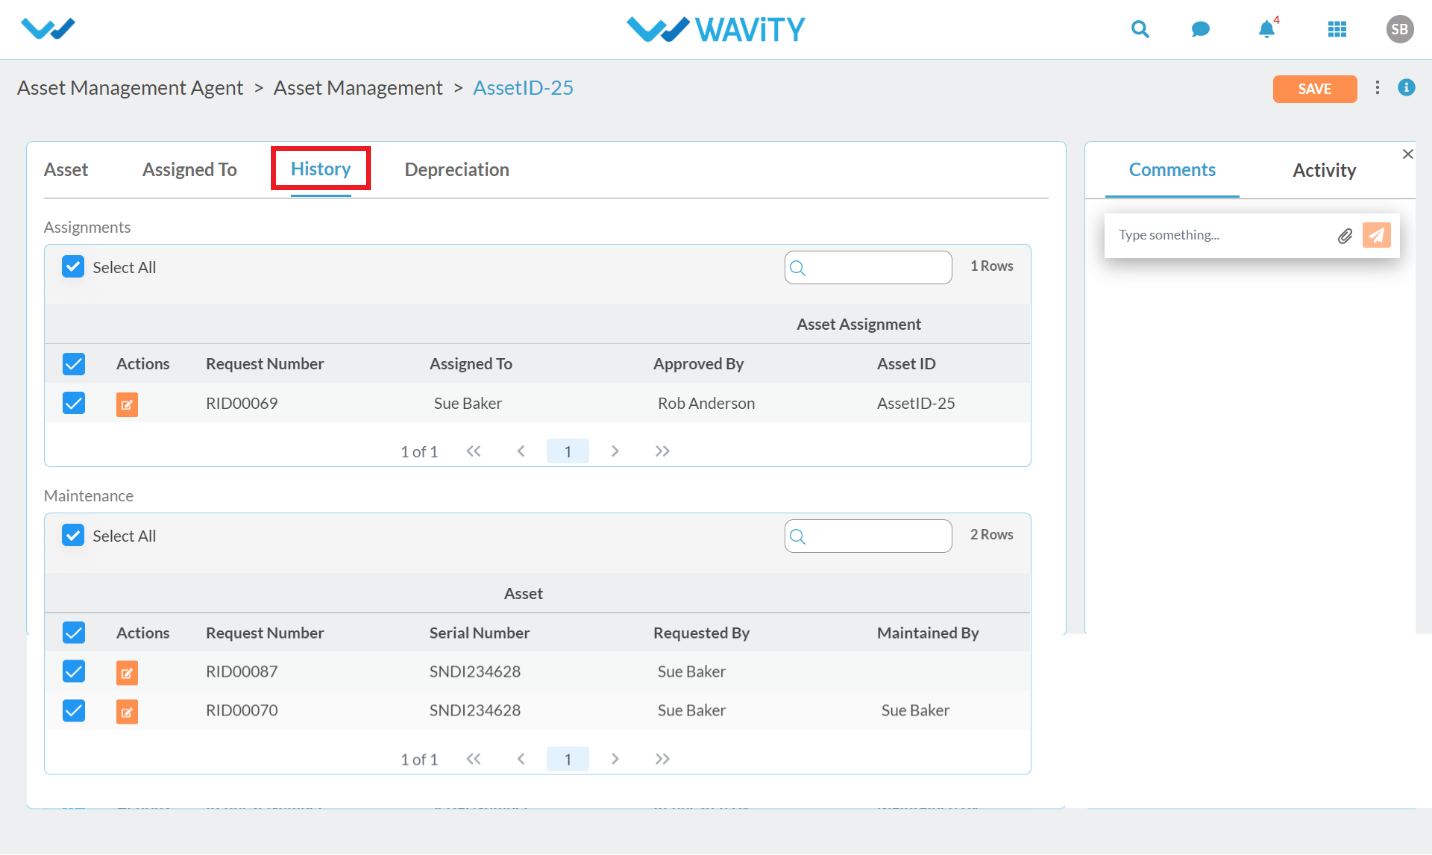
- In the ‘History’ section, History details and Maintenance records will be displayed as shown below.
- In the ‘Depreciation’ section, You can view the current value of the asset based on depreciation method used.

- Click on “Asset Categories” quick link from the Agent Dashboard to view and edit the master data related to categories of the asset.
- Click on “Assets by department” table widget to view count of assets categorized department wise.

- It will display count of assets categorized department wise in table format. Similar table widget can be configured for location wise categorization. You can export the data to excel sheet as shown below.

- Click on “Asset Configuration” analytics widget.
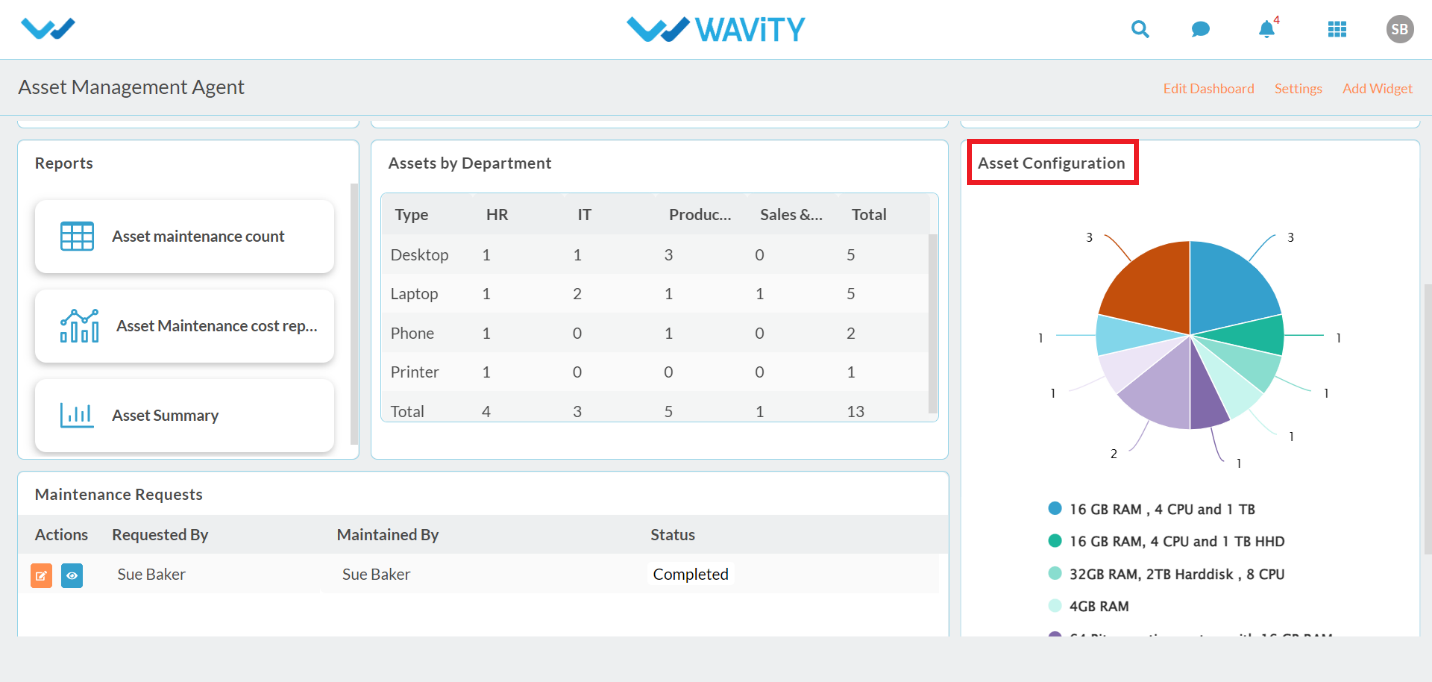
- It will display Asset Configuration in a Pie Chart format. All the Analytics widget can be printed and downloaded in different formats as shown below.

- Click on “Asset Summary” under reports as shown below.

- It will display Asset quantity based on configuration, asset location, type of Assets and Asset State. Click on Asset Location (Green bar).

- Quantity of Assets based on locations will be displayed as shown below.

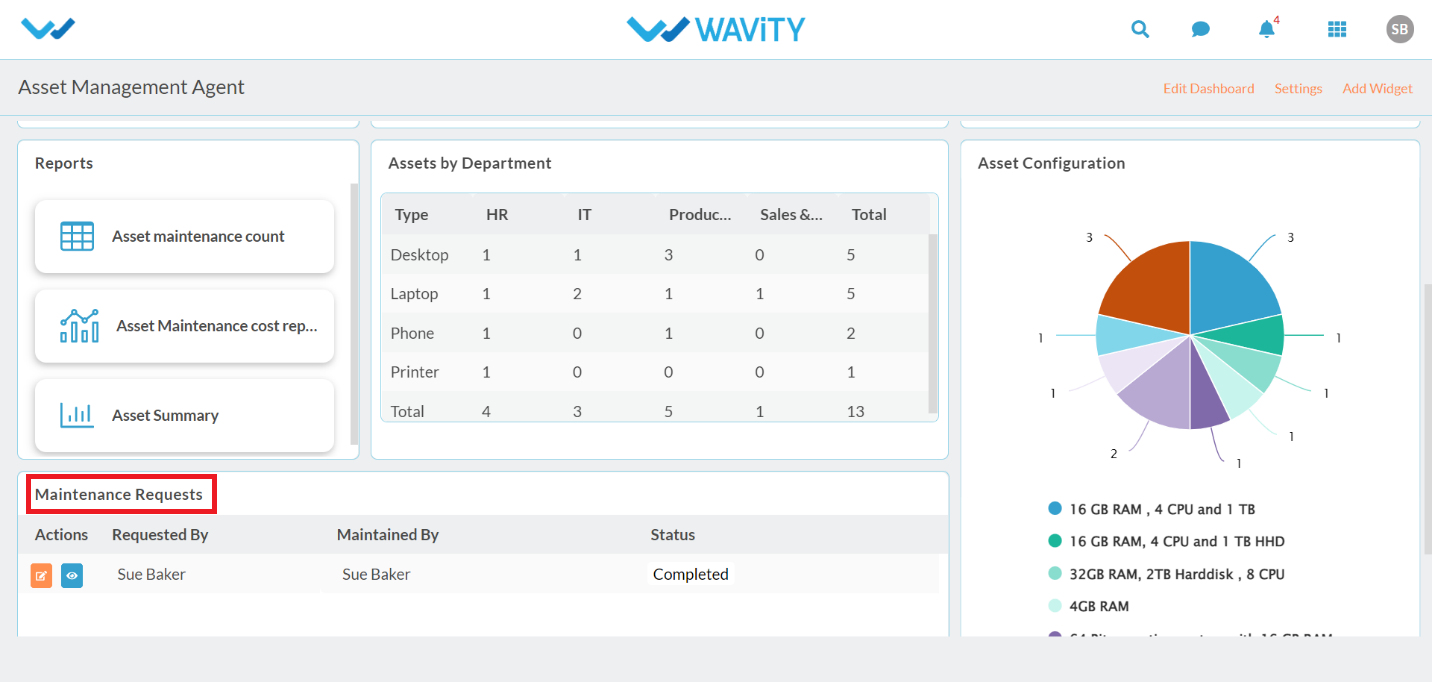
- Click on “Maintenance requests” to view all the assets under maintenance.
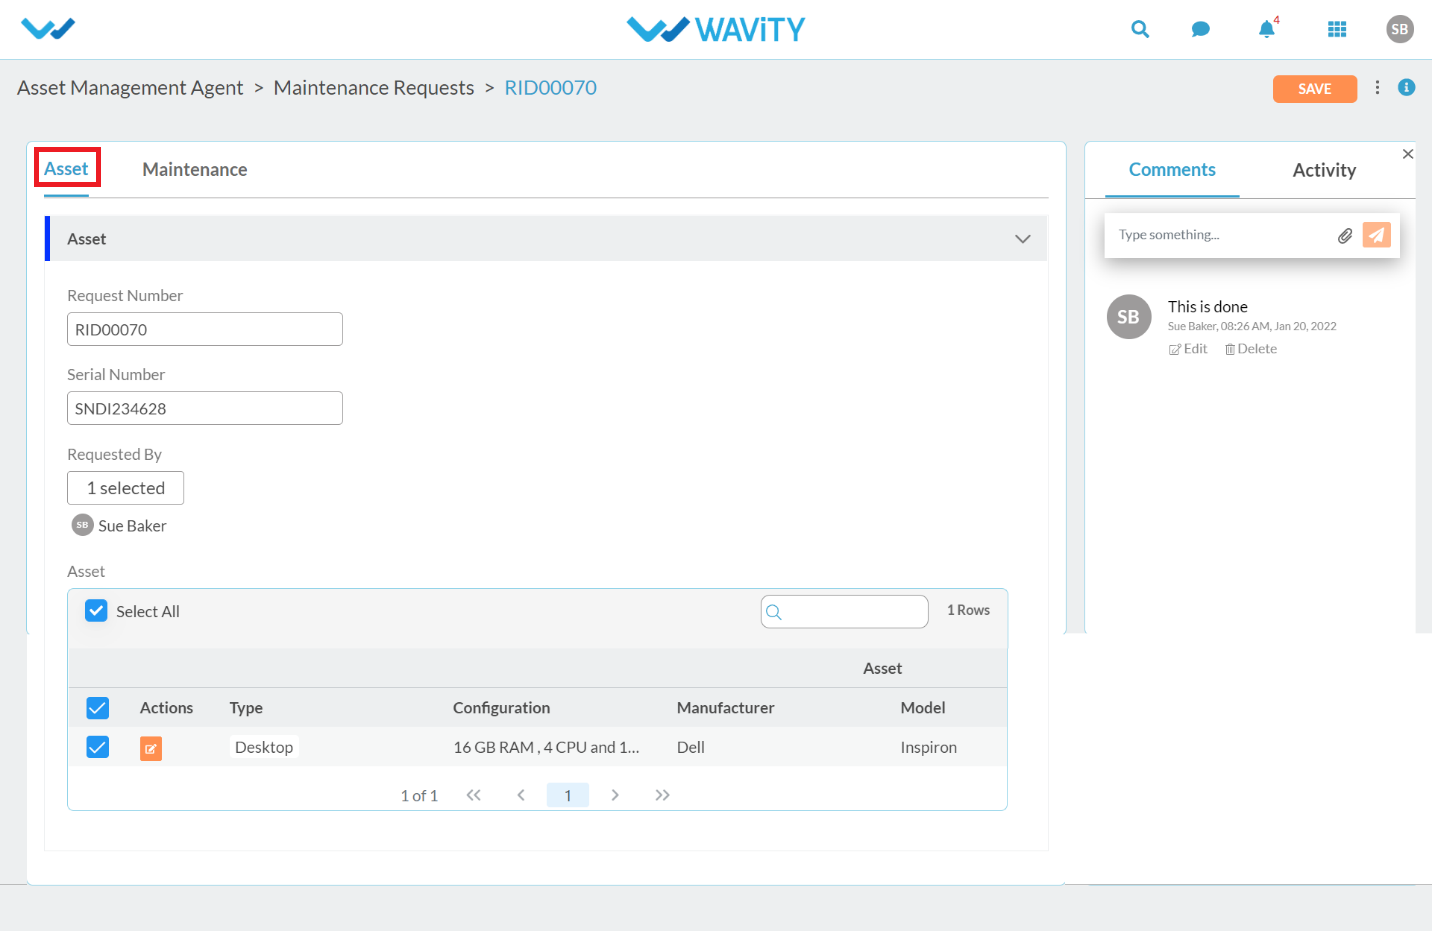
- Click on “Blue Icon” to view the maintenance records of the asset as shown below.

- In the following page, It will display request number, serial number of the asset under maintenance, requested user detail and asset details.
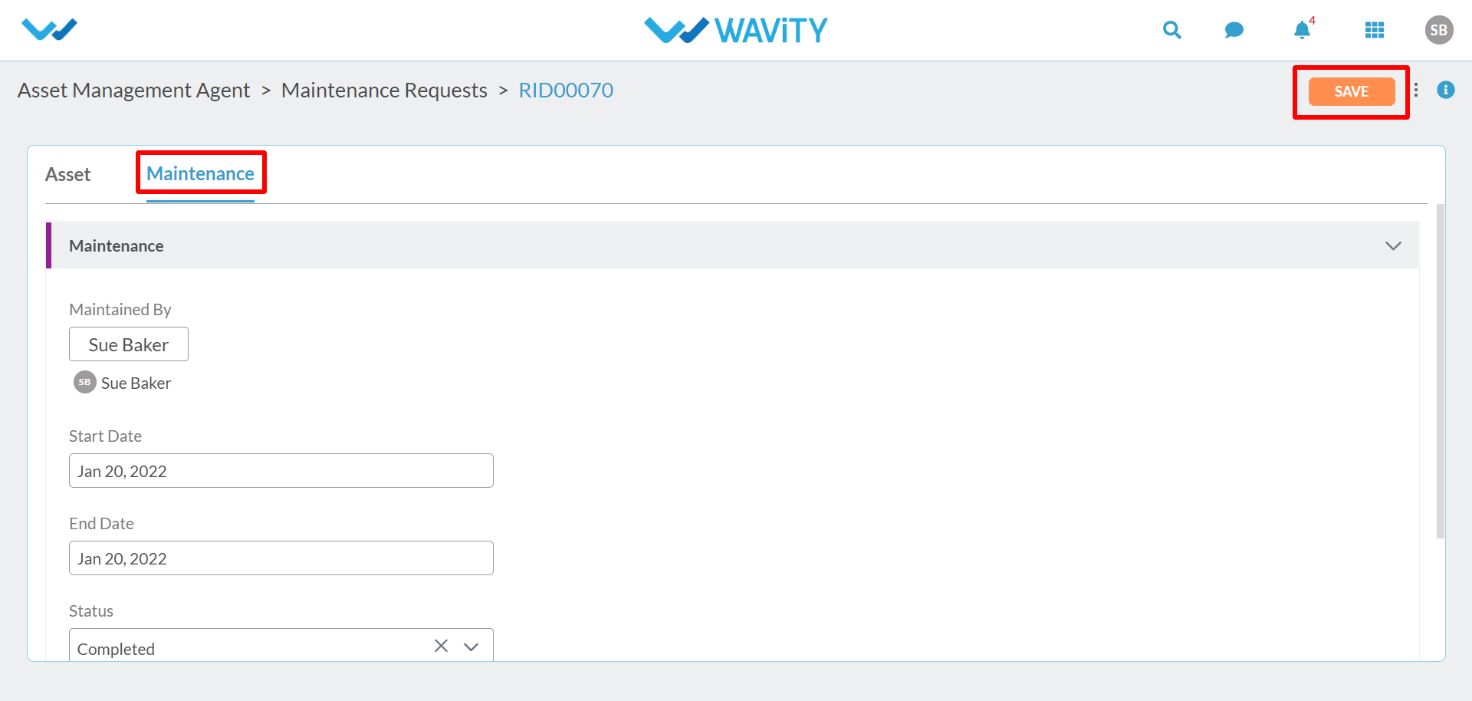
- In the “maintenance” section, it will display maintenance agent details, Start and End date of maintenance of the asset, Status and the cost incurred during maintenance.
Procurement Team:
- Login to your Wavity account. After logging in, Procurement dashboard will be displayed as shown below. Dashboard can be edited by clicking on ‘Edit Dashboard’. Procurement dashboard contains the following major functions:
Quick Links: Quick Links to navigate through the platform.
Analytics & Reports: Analytics and reports based on role and data in the platform.
Activity Stream: It will display all the activities carried out in the platform.
- Click on “Procurement Request” to view all the assets which are to be procured.
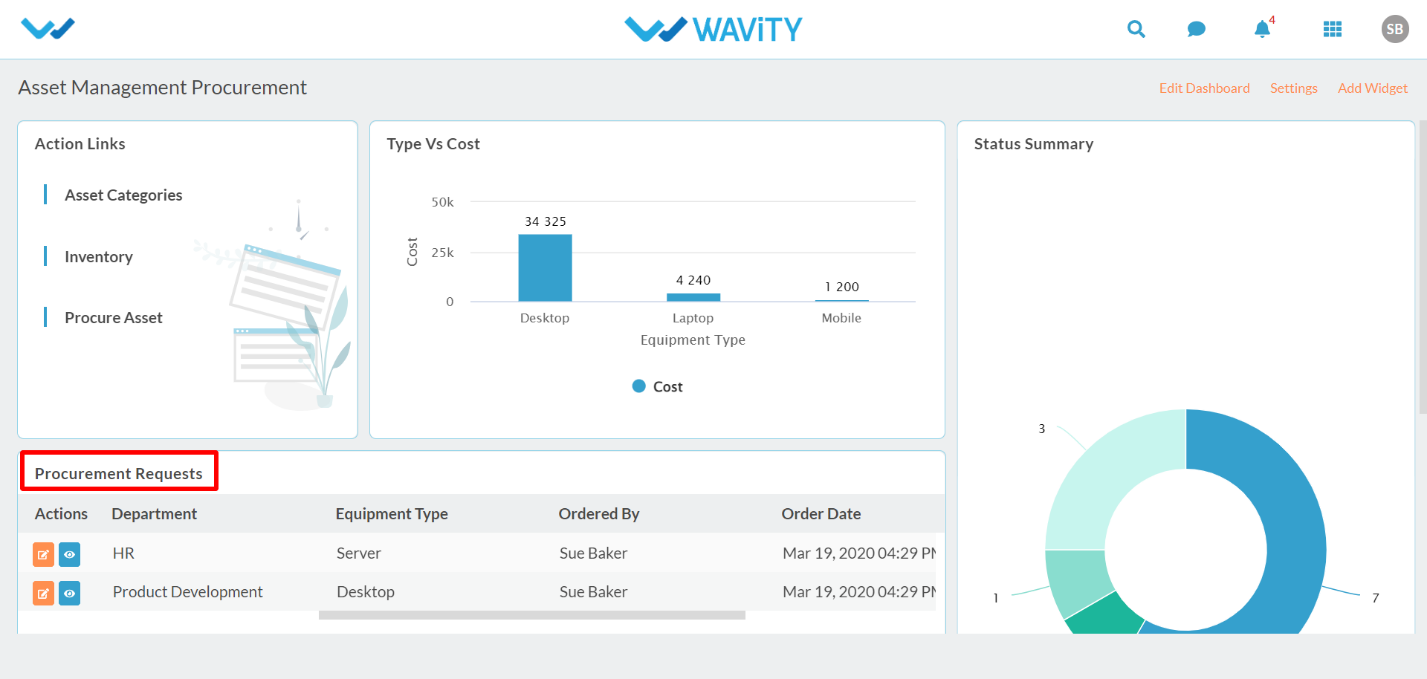
- Click on “Blue Icon” to view a particular Procurement request.

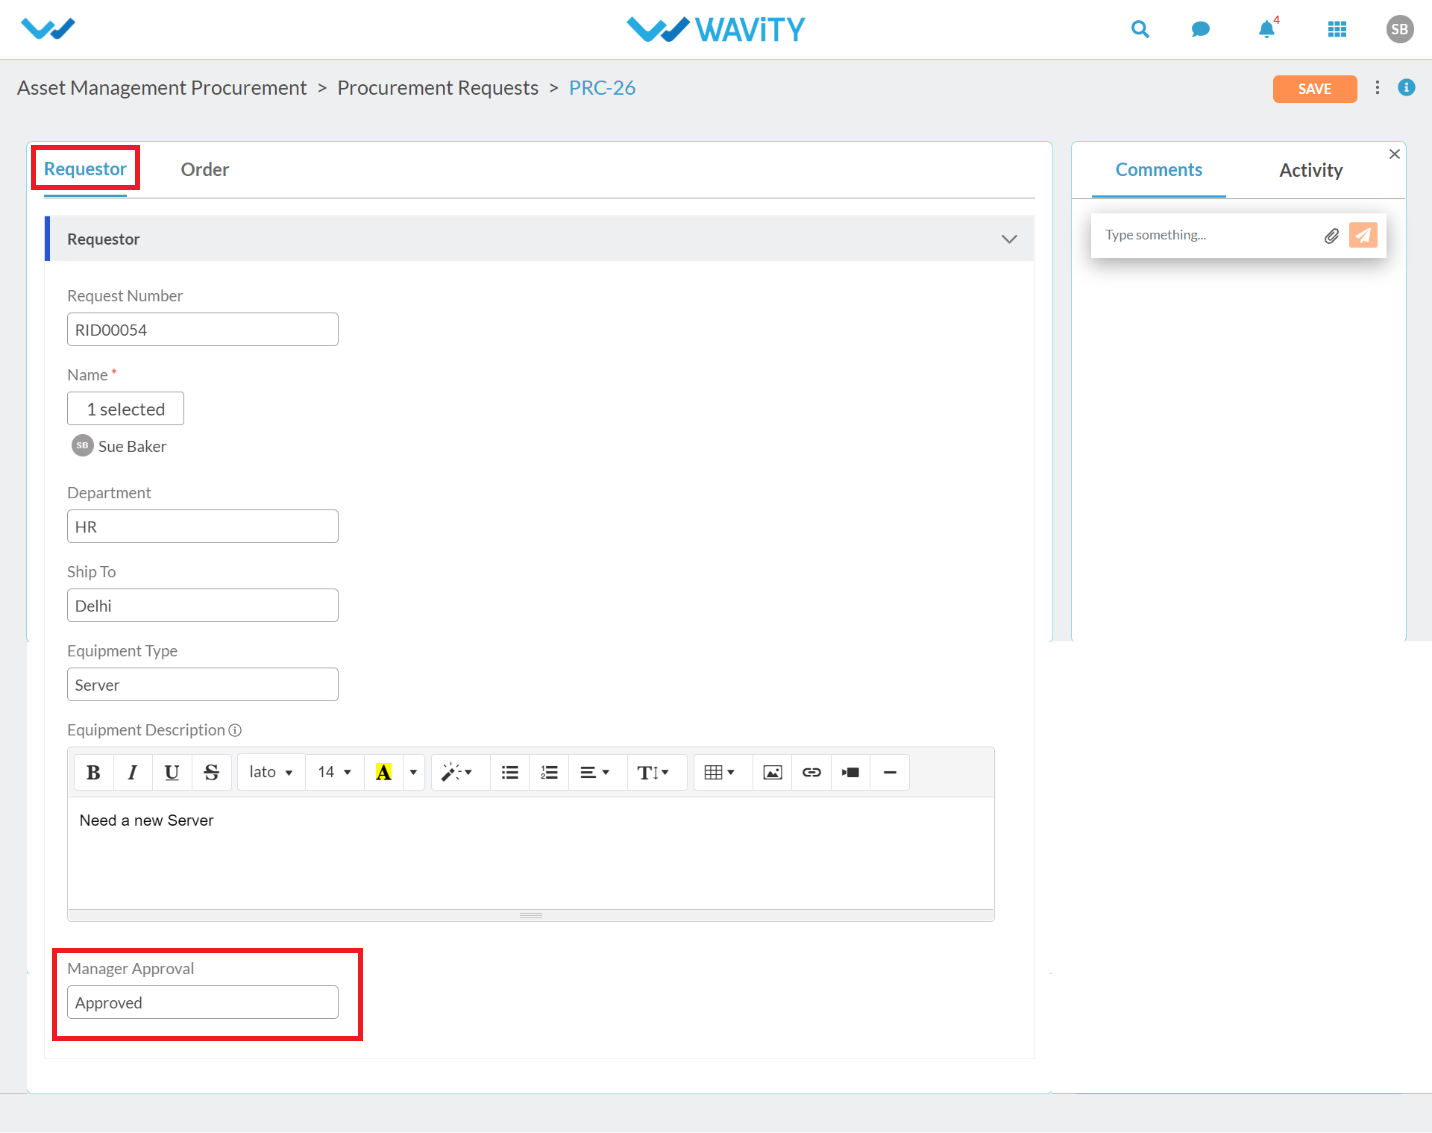
- In the “Requester” section of the “Procurement Request” page, you can view details like Request number, Requester name, Department, Location to be shipped, Equipment type and description and Manager’s approval for the request.
- In the “Order” section of the “Procurement Request” page, you can view and edit details like Name of Agent, Order number (Auto Generated), Order date, Status of the procurement request, Cost of the Asset to be procurement and the cost center. Click on ‘Save’ button to create the record.

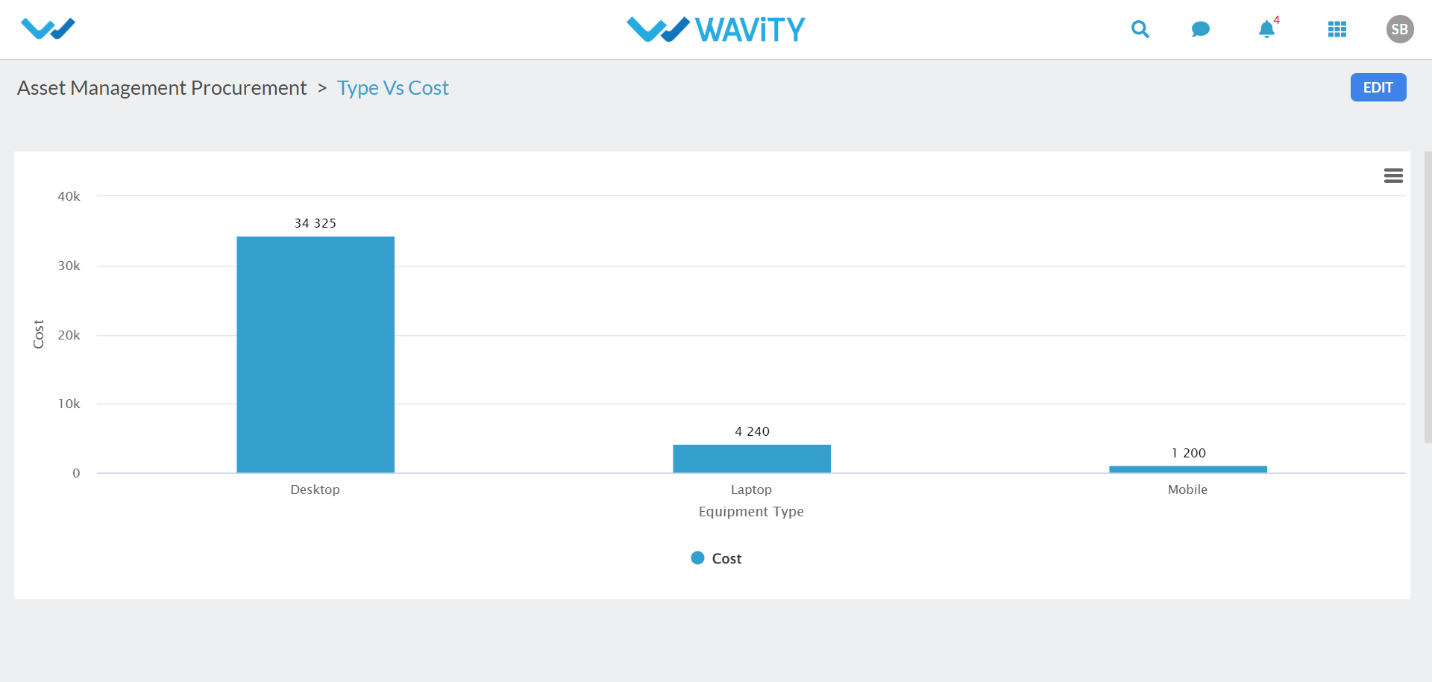
- Click on “Type vs Cost’ Analytical widget in the Procurement dashboard.
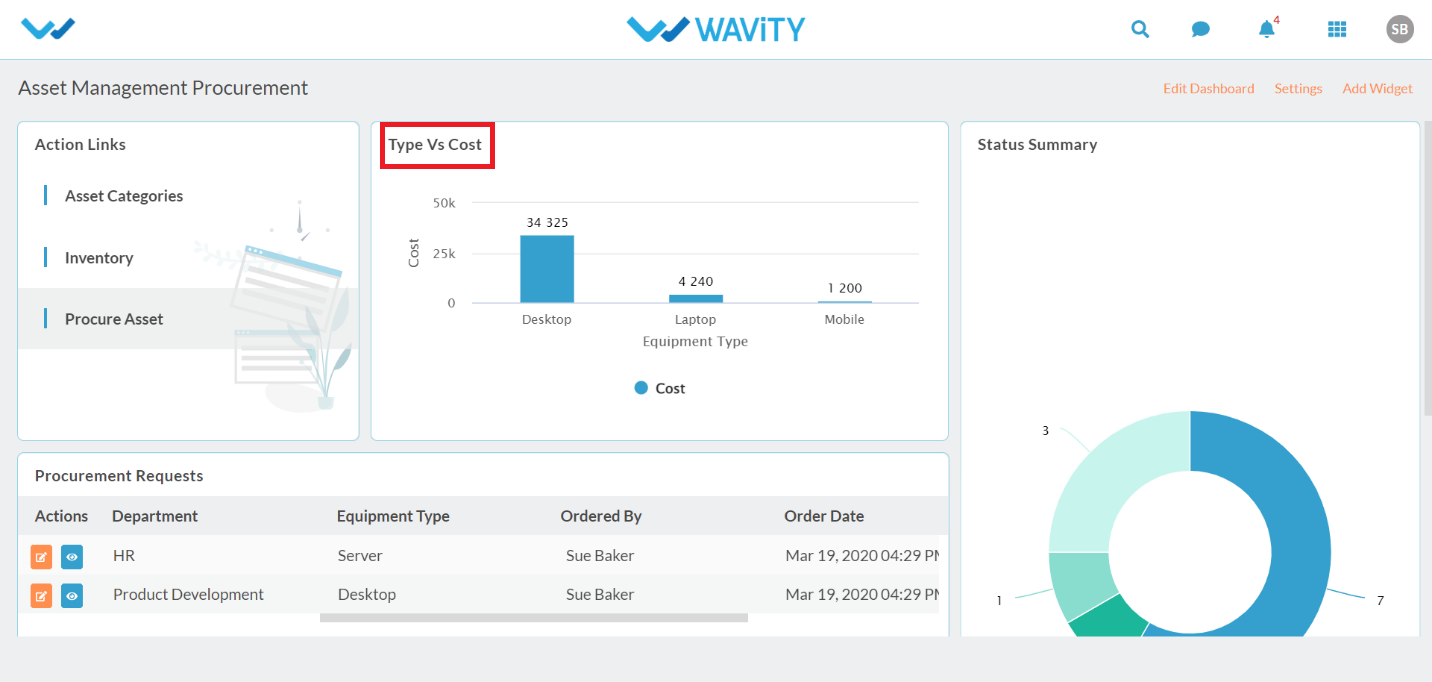
- It will display “type vs cost”analytics of the asset in bar format. Similar analytics can be configure based on weekly or monthly data.