App Design Settings and Advanced settings:
- Only Admin shall have access to edit or apply advanced settings while creating an App
- Click on profile icon and select “Design Tools” (only admin can view and select Design Tools) as shown below.

- In “Apps” section, all the existing applications of the tenant will be displayed for the admin.
- Choose an Application which you want to make change settings and Click on “3 dots” icon. Select the option “Open in App Designer”.

- Click on the “Settings Icon” as shown in the screenshot below to view or edit the Application settings.

Application Settings:
- You can change the name of the application by clicking Change app name.
- You can change the description of application by clicking on Change description.
- You can select the Data creators for the application based on the requirement.
- You can lock created record data when certain conditions are met. Each created record can be locked at any state by selecting an option from dropdown of Lock Data when feature. Here we have four different states to lock record Data.
- Open: When this state is selected each record in the selected app will be locked as soon as it is created.
- Closed: When the record state is closed, then record will be locked.
- Approver Accepted: When the approver accepts the request, record will be locked.
- Manager Accepted: When the manager accepts the request, record will be locked.
- You can select multiple states from dropdown option at a time to lock record data.
- If manager/approver wants to edit the record even after record is locked, you can select or check the box to allow approver(s)/manager(s) to edit.
- Note: After editing the app if any settings are changed then you should click on “Apply” button.

Application Advanced settings:
- Click on “Advanced Settings” as shown below to view or edit advance settings of application.

- Under Access tab in advance settings, you can select user(s) and group(s) for App Owner/Admin, Approver(s), Moderator(s) and Designer(s) for access to the application. You can also tag applications in categories, just click on Add and selecting the application names.

- You can edit the Owner/Admin for a particular app by selecting and deselecting user(s) and group(s) in the drop down.

- Here you can select single/multiple users and groups for Approver field, who can update the status or approve the record information in the app.

- Here you can select single/multiple users and groups to view/update the record data for Moderator Section of the application.

- Admin can give access for App Designer part for selected application, by selecting the single/multiple users and groups in the Designer option of advanced settings of application.

- If only App owner/Admin should view the application in the app page, then you can select and check box as selected as shown below.
- This feature is available only for company catalogue app type.

- To know the reference applications of this particular app, you can tag single/multiple applications by simply selecting +Add option in the category.

Under Date Tab in advance settings you can make changes for Record listing page:
Data Tab
- In this tab, you can edit the record list view, columns to be displayed in the app.

- Here you can select and deselect the columns to be displayed in the record list view for application. At least two fields should be selected.

Contributor Filters under Data Tab of Advanced settings of Application:
Contributor Filters classified into two different type filters
- Info Filters: Filters are based on Record
- Data Filters: Filters are based on Data controls of the application Design

Info filters:
- You can filter the records by selecting property based on user:
- Created by
- Modified by
- Created Time
- Modified Time
- Status of record
- The fields in value(s) change as per the property you have selected.

- You can also add multiple additional filters by clicking on Add Filter button.
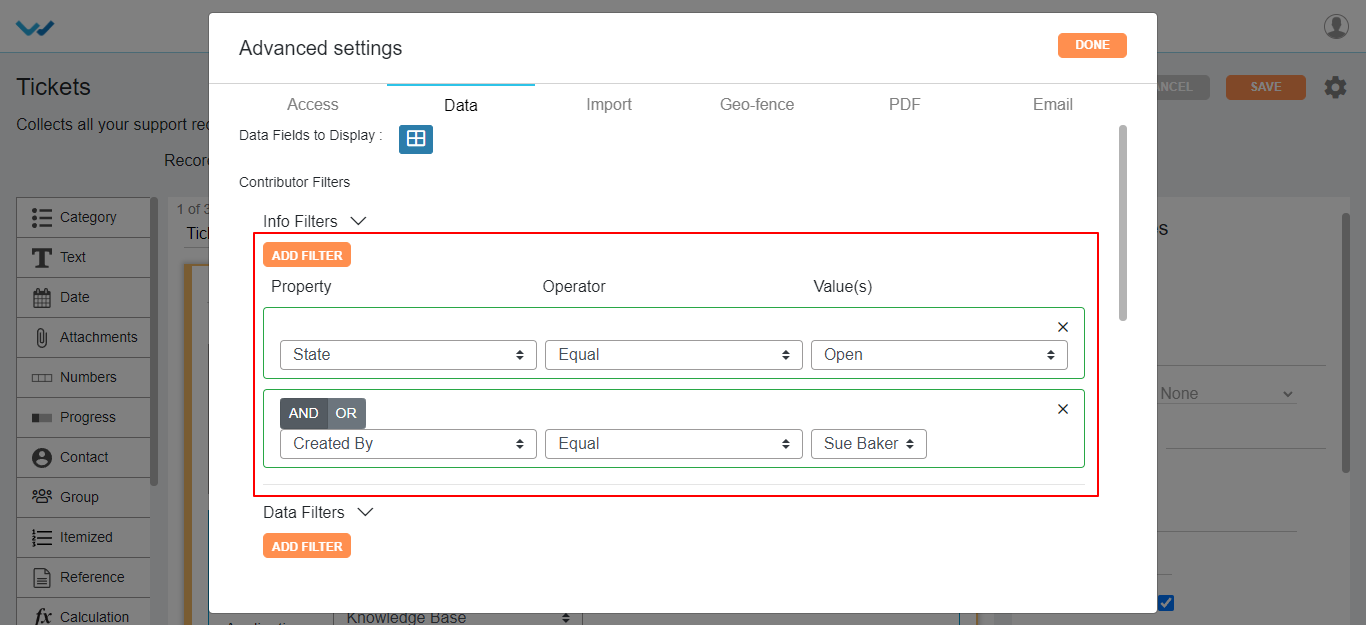
- You can also specify AND | OR for filters if you want to satisfy both the Filters and any one of the Filter respectively.

Data Filters:
- The fields in Property and value(s) change as per the data controls in the app you have selected.

- Here you can select multiple Data Filters and also you can specify AND | OR for filters similar to info filters.
- Here you can add customized filers by clicking on Named Filters button and give a caption as per required.
- You can apply Info and data filters similar to contributor filters.

- Here we also have one more filter naming “select simple filter” without any conditions. On selection of this feature in the dropdown displays the label name of data controls of the app you have selected.
- Maximum you can select three fields.

Create-Record Features:
- For record uniqueness and to avoid duplication of records, you can select the data control of that app from dropdown of Unique data Field(s). Select data controls to define uniqueness at record level.
- You can select single or multiple data controls for uniqueness of record.

Allow Data entry only by WBots:
- If you enable this feature, the records in the application are created only through Wbots workflow automation.
- You cannot create records manually in the application.

- After a record creation is started and you may don’t want to submit the record half filled, then you can save the record as draft. For this option you can check box Enabled Save as Draft.

- A record can be updated only by the system in particular app. For this option you can checkbox Allow Data modification only by wBots.
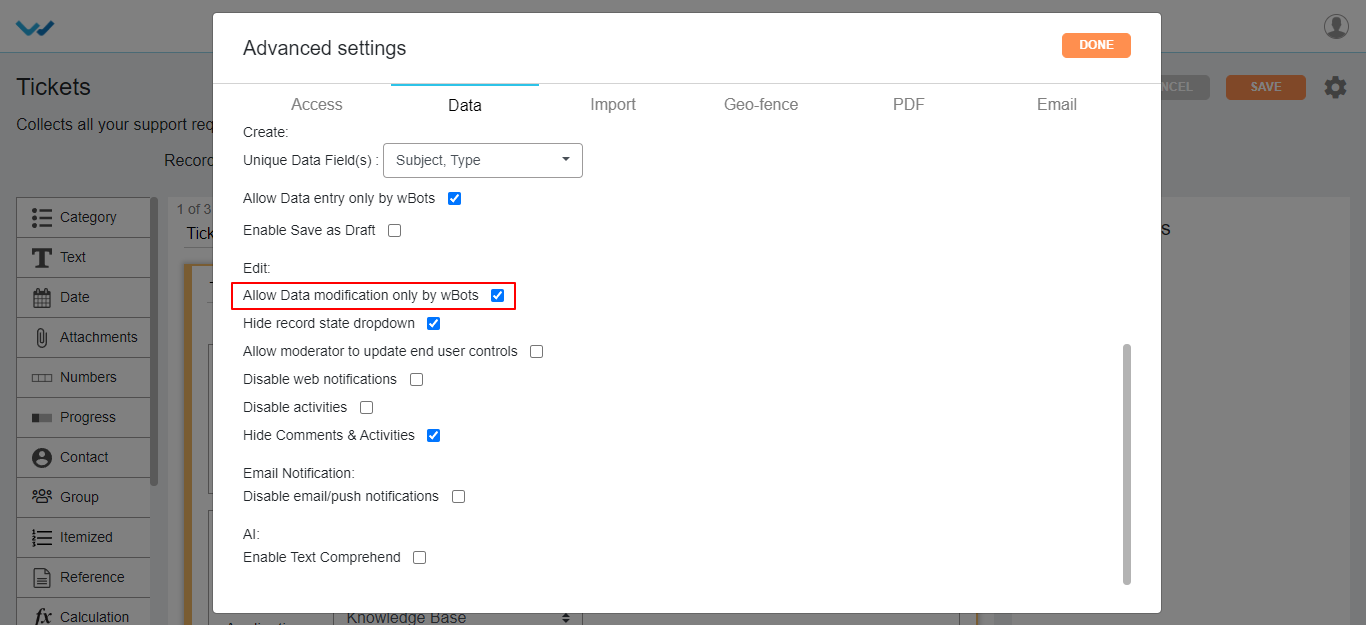
- Hide Record state dropdown: Disables the record state dropdown in record creation page.

There are some more features of application advanced settings listed below:
- Allow moderator to update end user controls: Enabling this feature will give access to edit end User data to the moderator.
- Disable Web Notifications: This feature disables the web notifications, when the record is created or modified in the application level.
- Disable activity: Disables activity stream notifications, when the record is created or modified and commented to the record of that app.
- Hide comments & activities: This feature is also similar to the Activity feature which disables the record activities of that app.
- Email Notification: Enabling this feature will disable the all the notification emails and push notifications of that app created by using Wbots Workflow.
- AI (Enable Text Comprehend): Enabling this feature shows the sentimental analysis of the record in table widgets of that app.

Data Import Settings:
- Enable wBots: Enabling this feature will trigger the Wbot workflow while importing the data into the app.

- You can import the data into particular app using Data import settings.

Import rules:
- Create: You can select the actions such as Create which creates new record at the data import time.

- Create & Update: on selecting the Create & Update option in importing rules, you will get Update Rules section under it.
- Select the data controls from dropdown to be created/updated.
- Select the action to update based on requirement, wheatear the data to be created New/overwrite, overwrite, skip.
- Where you have to select from the dropdown provided and select an action for the same with the help icons provided on the page.

Geo Fence Settings:
- You can enable or disable Geo Fence for the app in Geo Fence settings.

- You can make use of Geo Fence by check boxing Enabled Geo Fence option and select the fence name from dropdown and click on Done button.

PDF Settings: Pdf Settings mainly used for the printing the record of that app.
- Based on selection of pdf settings, the record page will be printed in the pdf format.
- We can secure the record by the password option for either single record or bulk records in the pdf settings of that app.

Email: You can select Integrated Email directly from Email feature for the particular app from the advanced settings.
- Select the integrated Email from the dropdown for that app, for creating the records in that app by using Email.
